A Simple Introduction to Working with LVM (mirror)

Note: I refer to this article all the time, so I’ve decided to mirror it here on my site. It comes from the now-defunct Debian Administration website.

A simple introduction to working with LVM

Posted by Steve on Wed 28 Jun 2006 at 21:22

The logical volume manager allows you to create and manage the storage of your servers in a very useful manner; adding, removing, and resizing partitions on demand. Getting started with LVM can be a little confusing to newcomer so this guide intends to show the basics in a simple manner.

There several pieces of terminology that you’ll need to understand to make the best use of LVM. The most important things you must know are:

  • physical volumes
    • These are your physical disks, or disk partitions, such as /dev/hda or /dev/hdb1. These are what you’d be used to using when mounting/unmounting things. Using LVM we can combine multiple physical volumes into volume groups.
  • volume groups
    • A volume group is comprised of real physical volumes, and is the storage used to create logical volumes which you can create/resize/remove and use. You can consider a volume group as a “virtual partition” which is comprised of an arbitary number of physical volumes.
  • logical volumes
    • These are the volumes that you’ll ultimately end up mounting upon your system. They can be added, removed, and resized on the fly. Since these are contained in the volume groups they can be bigger than any single physical volume you might have. (ie. 4x5Gb drives can be combined into one 20Gb volume group, and you can then create two 10Gb logical volumes.)

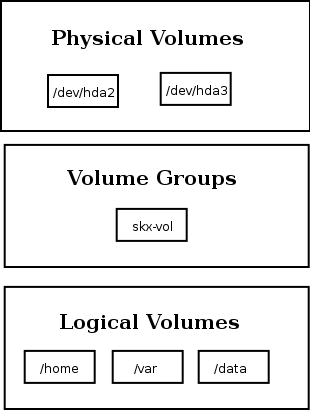
Logically these are stacked from top to bottom like this:


Dia source file

Creating A Volume Group

To use LVM you need to take at least one partition, initialise it for use with LVM and then include it in a volume group. Why would you do this? Well it would let you create new partitions on the fly, and make better use of your space.

In my case I have a laptop with the following setup:

    Name        Flags      Part Type  FS Type          [Label]        Size (MB)
 ------------------------------------------------------------------------------
    hda1        Boot        Primary   Linux ext3       [/]              8000.01 
    hda2                    Primary   Linux swap / Solaris              1000.20
    hda3                    Primary   Linux                            31007.57

Here I have a 7Gb root partition which contains my Debian GNU/Linux installation. I also have a 28Gb partition which will be used by LVM. I’ve chosen this setup so that I can create a dedicated /home partition using LVM – and if I need more space I can extend it.

In this example hda1, hda2, and hda3 are all physical volumes. We’ll initialize hda3 as a physical volume:

root@lappy:~# pvcreate /dev/hda3

If you wanted to combine several disks, or partitions you could do the same for those:

root@lappy:~# pvcreate /dev/hdb
root@lappy:~# pvcreate /dev/hdc

Once we’ve initialised the partitions, or drives, we will create a volume group which is built up of them:

root@lappy:~# vgcreate skx-vol /dev/hda3

Here “skx-vol” is the name of the volume group. (If you wanted to create a single volume spanning two disks you’d run “vgcreate skx-vol /dev/hdb /dev/hdc“.)

If you’ve done this correctly you’ll be able to see it included in the output of vgscan:

root@lappy:~# vgscan
  Reading all physical volumes.  This may take a while...
  Found volume group "skx-vol" using metadata type lvm2

Now that we have a volume group (called skx-vol) we can actually start using it.

Working with logical volumes

What we really want to do is create logical volumes which we can mount and actually use. In the future if we run out of space on this volume we can resize it to gain more storage. Depending on the filesystem you’ve chosen you can even do this on the fly!

For test purposes we’ll create a small volume with the name ‘test’:

root@lappy:~# lvcreate -n test --size 1g skx-vol
Logical volume "test" created

This command creates a volume of size 1Gb with the name test hosted on the LVM volume group skx-vol.

The logical volume will now be accessible via /dev/skx-vol/test, and may be formatted and mounted just like any other partition:

root@lappy:~# mkfs.ext3 /dev/skx-vol/test
root@lappy:~# mkdir /home/test
root@lappy:~# mount /dev/skx-vol/test  /home/test

Cool, huh?

Now we get onto the fun stuff. Let us pretend that the test partition is full and we want to make it bigger. First of all we can look at how big it is at the moment with lvdisplay:

root@lappy:~# lvdisplay 
  --- Logical volume ---
  LV Name                /dev/skx-vol/test
  VG Name                skx-vol
  LV UUID                J5XlaT-e0Zj-4mHz-wtET-P6MQ-wsDV-Lk2o5A
  LV Write Access        read/write
  LV Status              available
  # open                 0
  LV Size                1.00 GB
  Current LE             256
  Segments               1
  Allocation             inherit
  Read ahead sectors     0
  Block device           254:0
   

We see it is 1Gb in size (no suprise really!) before we go on to resize the volume remember we should unmount it first:

root@lappy:~# umount  /home/test/
root@lappy:~# lvextend -L+1g /dev/skx-vol/test 
Extending logical volume test to 2.00 GB
Logical volume test successfully resized

(It is possible to resize ext3 filesystems whilst they’re mounted, but I’d still suggest doing it offline as that is less scary.)

Looking at lvdisplay again we can see the volume was resized:

root@lappy:~# lvdisplay 
  --- Logical volume ---
  LV Name                /dev/skx-vol/test
  VG Name                skx-vg
  LV UUID                uh7umg-7DqT-G2Ve-nNSX-03rs-KzFA-4fEwPX
  LV Write Access        read/write
  LV Status              available
  # open                 0
  LV Size                2.00 GB
  Current LE             512
  Segments               1
  Allocation             inherit
  Read ahead sectors     0
  Block device           254:0

The important thing to realise is that although the volume has been resized the ext3 filesystem on it has stayed unchanged. We need to resize the filesystem to actually fill the volume:

root@lappy:~# e2fsck -f /dev/skx-vol/test 
root@lappy:~# resize2fs /dev/skx-vol/test

Remount the logical volume and you’ll discover it is now only half full instead of completely full!

If you get bored of the volume and its contents you can remove it with the lvremove command:

root@lappy:~# lvremove /dev/skx-vol/test
Do you really want to remove active logical volume "test"? [y/n]: y
Logical volume "test" successfully removed

Other userful commands include lvrename to change the name, and lvreduce to reduce the size of a volume.

Mounting Logical Volumes

In the previous section we showed how you could mount a logical volume, with a command like this:

mount /dev/skx-vol/test  /home/test

If you want your partition to be mounted at boot-time you should update your /etc/fstab to contain an entry like this:

/dev/skx-vol/home    /home       ext3  noatime  0 2
/dev/skx-vol/backups /backups    ext3  noatime  0 2

Meta-Data

If you’re worried about losing details about your volumes in the event of problems do not worry. The current state of the LVM setup upon your machine is maintained in the event of errors.

Running pvdisplay will allow you to see which physical volume(s) make up your volume group. In the case of our example we only used /dev/hda3, but if you’re using more volumes it might be useful to take a look at them with the pvdisplay command:

root@lappy:~# pvdisplay 
  --- Physical volume ---
  PV Name               /dev/hda3
  VG Name               skx-vol
  PV Size               28.88 GB / not usable 0   
  Allocatable           yes 
  PE Size (KByte)       4096
  Total PE              7392
  Free PE               5280
  Allocated PE          2112
  PV UUID               WyXQtL-OdT6-GnGd-edKF-tjRU-hoLA-RJuQ6x

If we ever lost this information we could find it contained in the file /etc/lvm/backup/skx-vol.

Similarly if we wanted to know which logical volumes we’d created we could example the directory /etc/lvm/archive. This contains numbered files containing backups of the operations we’ve conducted.

As an example we created the “test” volume, which we went on to resize. Here is the first section of /etc/lvm/archive/skx-vol_000009.vg:

# Generated by LVM2: Sat Jun 10 12:35:57 2006

contents = "Text Format Volume Group"
version = 1

description = "Created *before* executing 'lvcreate -n test --size 1g skx-vg'"

creation_host = "lappy" 
# Linux lappy 2.6.8-2-686 #1 Sat Jan 8 16:50:08 EST 2005 i686

Filesystems

When it comes to using LVM effectively it is worth considering the filesystem that you wish to use upon your logical volumes.

If you choose a filesystem which doesn’t support resizing then increasing the size of your LVM volumes would be pointless. Here is a brief list of the resizable filesystems:

filesystem      increase while mounted  increase while unmounted  decrease

ext2fs          yes                     yes                       yes
ext3fs          yes                     yes                       yes
ReiserFS        yes                     yes                       yes
JFS             no                      no                        no
XFS             yes                     no                        no

Note that some filesystems can be increased in size, but cannot be reduced.

If I’ve missed one you’re familiar with please do let me know.

Closing Comments

If you’re ready to make the jump to LVM and don’t have a lot of space handy for allocating to LVM then it might make sense to reinstall your system. The Debian installer has excellent support for creating LVM setups.

We’ve not really covered advanced usage in this introduction but there is a lot of readable and useful documentation available if you’re prepared to search for it. The most obvious starting point is the LVM howto.

Backup Your Dropbox Files with rdiff-backup

The Problem

Teresa and I use a single Dropbox account to share files between our computers. I also use the same account to store (and sync) plain-text notes on my iPad and iPhone (I use the apps PlainText and iA Writer). In case things go wrong with these apps, the syncing, or with Dropbox itself, I want to backup my Dropbox files and keep past snapshots of the backups so I can go back in time.

The Solution

rdiff-backup can do this. It is a command-line tool written in Python that:

…backs up one directory to another, possibly over a network. The target directory ends up a copy of the source directory, but extra reverse diffs are stored in a special subdirectory of that target directory, so you can still recover files lost some time ago. The idea is to combine the best features of a mirror and an incremental backup.

To make this all happen, I have Dropbox installed, signed-in, and running on my Linux desktop/server, which runs Ubuntu 11.04 Natty with Gnome 2.

Install rdiff-backup thusly:

    # aptitude install rdiff-backup

I use the directory /backup/ to hold all my backup targets, so I can run rdiff-backup like this:

    $ rdiff-backup  \
        --exclude $HOME/Dropbox/.dropbox \
        --exclude $HOME/Dropbox/.dropbox.cache \
        $HOME/Dropbox /backup/Dropbox

Every time I run rdiff-backup like this, it creates a new snapshot of my Dropbox files. Old snapshots are kept until I decide to purge them (if at all). To purge any snapshots older than two months, for example, I run this command:

    $ rdiff-backup --force --remove-older-than 2M /backup/Dropbox

I run the above two commands in an @hourly crontab script to keep this all happening automatically.

Browsing Past Snapshots

rdiff-backup has its own commands for digging into the files stored in the past snapshots, but it requires exactly knowing the filenames and backup times. Another tool, rdiff-backup-fs solves this problem by mounting the rdiff-backup backup directory as a FUSE filesystem, allowing me to grep and find my way through a directory tree of all snapshots.

After installing FUSE and rdiff-backup-fs, I mount my Dropbox snapshot tree with this command:

    $ rdiff-backup-fs ~/mnt /backup/Dropbox

Note that the order of the arguments for mounting source and target are backwards compared to the canonical mount command.

A long listing of my 10-oldest snapshots looks like this:

    $ ls -lF ~/mnt/ | head -10
    total 0
    dr-xr-xr-x 1 root root 4096 2013-03-10 13:52 2013-01-06T05:00:01/
    dr-xr-xr-x 1 root root 4096 2013-03-10 13:52 2013-01-06T06:00:01/
    dr-xr-xr-x 1 root root 4096 2013-03-10 13:52 2013-01-06T07:00:01/
    dr-xr-xr-x 1 root root 4096 2013-03-10 13:52 2013-01-06T08:00:01/
    dr-xr-xr-x 1 root root 4096 2013-03-10 13:52 2013-01-06T09:00:01/
    dr-xr-xr-x 1 root root 4096 2013-03-10 13:52 2013-01-06T10:00:01/
    dr-xr-xr-x 1 root root 4096 2013-03-10 13:52 2013-01-06T11:00:01/
    dr-xr-xr-x 1 root root 4096 2013-03-10 13:52 2013-01-06T12:00:01/
    dr-xr-xr-x 1 root root 4096 2013-03-10 13:52 2013-01-06T13:00:01/

I can then explore all my snapshots at once with any tools wish.

When done, I unmount the rdiff-backup-fs filesystem with:

    $ /bin/fusermount -u ~/mnt

Emailing cron output to different users

When a cron job generates output on either stdout or stderr, the output gets mailed to the owner of the crontab. Now, you can specify an alternative email address by setting the MAILTO environment variable in the crontab, but this applies to all jobs in the crontab.

So, if you want the output of different jobs to get mailed to different users, then you can just redirect the stdout and stderr of each job to the mail command like this:

13 02 * * *     /bin/backup 2>&1 | /usr/bin/mail -s "Cron <root@exobox> /bin/backup" \
user@example.net

MTR as a combined traceroute and ping tool

mtr combines the functionality of the traceroute and ping programs in a single network diagnostic tool.” And it’s really cool.

Like ping, it sends “echo” packets from your machine to the target machine to measure latency and packet loss along the network path, but it continuously displays updated statistics in real time as it operates.

Like traceroute, it shows the names or IP addresses of each machine along the network path, also updating these statistics for each machine.

Here’s some (frozen) sample output from the ncurses mode (terminal mode) mtr:

                                My traceroute  [v0.71]
exobox (0.0.0.0)                                             Thu Dec 21 16:15:01 2006
Keys:  Help   Display mode   Restart statistics   Order of fields   quit
                                             Packets               Pings
 Host                                      Loss%   Snt   Last   Avg  Best  Wrst StDev
 1.                                         0.0%    20    0.4   0.3   0.2   0.7   0.1
 2.                                         0.0%    20    1.6   1.4   1.0   2.7   0.4
 3.                                         0.0%    19    1.3   1.3   1.0   2.7   0.4
 4. 10.0.0.25                               0.0%    19    1.1   1.2   1.0   2.7   0.4
 5. 219.142.10.17                           0.0%    19    1.4   2.6   1.2  16.0   3.3
 6. bj141-130-121.bjtelecom.net             0.0%    19    1.4   1.6   1.4   2.5   0.3
 7. 202.97.57.221                           0.0%    19  199.3  12.0   1.3 199.3  45.4
 8. 202.97.37.9                             0.0%    19    1.7  35.7   1.3 186.5  56.2
 9. 202.97.53.146                           0.0%    19    1.8   2.0   1.5   4.8   0.8
10. 202.97.61.50                            0.0%    19  284.6 292.2 278.3 305.8   8.7
11. so-4-0-0.mpr2.lax9.us.above.net        15.8%    19  286.2 291.9 278.6 325.2  11.5
12. so-5-0-0.mpr1.iah1.us.above.net        15.8%    19  313.2 323.8 311.3 340.5   8.6
13. so-5-3-0.cr1.dfw2.us.above.net          5.3%    19  319.6 331.1 314.1 404.6  20.3
14. so-0-0-0.cr2.dfw2.us.above.net         11.1%    19  696.0 718.7 693.3 797.2  33.7
15. so-3-1-0.cr2.dca2.us.above.net         36.8%    19  347.4 354.9 342.5 368.7   8.6
16. so-0-1-0.mpr1.lhr3.uk.above.net        11.1%    19  421.5 423.6 411.1 438.2   7.8
17. so-1-0-0.mpr3.ams1.nl.above.net        11.1%    19  433.9 438.9 422.4 514.1  22.0
18. DutchDSL.above.net                     33.3%    19  423.1 432.7 418.7 463.0  11.4
19. ge-0-1-0-v189.rtr1.ams-rb.io.nl        27.8%    19  405.8 414.7 398.2 434.6  11.6
20. 213.196.40.242                         23.5%    18  404.8 418.1 399.9 485.8  21.9

Looking at the Avg column (units in ms), the above output shows that my network packets pass through Beijing Telecom’s routers to the U.S., then to the U.K., and finally to their destination in the Netherlands. A large latency increase occurs between lines 9 and 10 (presumably leaving P.R. China), and another between lines 13 and 16 (U.S. to U.K.).

mtr has some interesting display modes besides the above, where it shows the latency of each packet graphically according to a dynamic scale. In this way, the above points of really large latency can be easily detected.

mtr can be obtained from the mtr website, or it can be installed in Debian/Ubuntu by:

# apt-get install mtr-tiny

or

# apt-get install mtr

for the ncurses or X11 versions, respectively, although mtr-tiny appears to be installed by default in the Debian and Ubuntu machines I have tested. So you may already have it.

How to send an entire domain to /dev/null in Postfix

At Exoweb, our software developers use bogus email addresses of the form *@example.com (where I mean “example.com” literally, not as an example) to test their software’s ability to send email. Since I don’t want our Postfix server to attempt to deliver these messages out on the Internet, I need Postfix to handle these messages and blackhole them (make them disappear, sent to /dev/null). So what follows are instructions on how to blackhole an entire domain in Postfix.

First, we add a virtual_alias_maps entry to /etc/postfix/main.cf so that we can specify example.com as one of our virtual domains:

virtual_alias_maps = hash:/etc/postfix/virtual_alias

Inside /etc/postfix/virtual_alias, add a catchall address:

@example.com      blackhole@localhost

We have to use blackhole@localhost here and not /dev/null/ because virtual_alias_maps cannot run commands—it can only forward to real addresses. So we put an entry inside /etc/aliases to handle the blackhole:

blackhole:      /dev/null

This assumes that one of your mydestination domains in main.cf is localhost so that Postfix will actually consult the aliases file.

In order to make these changes take affect, you have to rebuild the aliases database, build the virtual_alias database, and reload your Postfix configuration. Respectively:

# newaliases
# postmap /etc/postfix/virtual_alias
# postfix reload

Now, any emails you send to blackhole@localhost will disappear, and so will any emails addressed to anyone@example.com (provided they are relayed through your Postfix server).

Footnote: The top-level and second-level domain names that are reserved for testing can be found in RFC 2606.

Spaghetti Wiring

When you work in a software development shop, spaghetti code is most certainly frowned upon. What about spaghetti wiring?

[Spaghetti wiring]

So this was the remains of the small electrical fire that occurred 15 minutes before I arrived at the office today… the charged main circuit to the room that houses most of our developers, their computers, and the all-important Ice Box.

Do you think this is enough to convince the building management that the building’s wiring needs professional help? No, unfortunately, I think we’ll still have to fight them to get adequate electrical capacity and safety. 🙁

Stop using backup email spooling

Here’s a great opinion piece from the blog of my DNS provider entitled: Want to reduce email spam to your mail server? Stop using backup spooling.

It is with regret that we have come to the following conclusion, but here it is: Offsite backup SMTP spoolers and backup mail exchangers have become worse than useless.

The problem is spam and the software that delivers it exploiting the weak authentication schemes inherent in the SMTP protocol itself. It used to be an annoyance, then it became a concern, it is now an epidemic and has resulted in the death of the offsite backup MX handler.

The author then goes on to explain what the problem is and why you won’t really miss your backup spooling. It’s a very interesting point of view (in a good way) that’s worth considering.